Preset Workflow Options
-
List activity workflows send when a subscriber joins a list in your account, opens a campaign, or clicks a link within a campaign. Workflows may also be triggered based on the date a subscriber is added to a list, or when they join or leave a group.
-
API workflows send using an API 3.0 endpoint.
-
Campaign Activity workflows can be completely customized and send based on a combination of triggers if the preset options don't offer exactly what you're looking for.
-
Integration workflows send based on activity from your integrations with Goal or Mandrill.
-
Date Based workflows send based on a date, such as a birthday or anniversary, or when data in a list field changes.
-
E-commerce workflows send when a subscriber makes a purchase from your website. These workflows require eCommerce360.
List Activity Workflows
-
Welcome message is used to send to subscribers as they sign up or are added to a list in your account. You can send a single welcome email or a series of onboarding emails to your subscribers to provide additional information about your company or inform them of coupons, sales, or other events.
-
Educate subscriber’s sends a series of informational emails to subscribers as they sign up or are added to a list in your account. For example, you can send new customers “getting started” guides or links to online courses.
-
Welcome series sends a series of emails to subscribers as they sign up or are added to a list in your account. Use this to easily create a series of emails welcoming subscribers to your list or to provide onboarding information to your subscribers. When you select this workflow, you will have the option to add 1 or 5 emails to your workflow. You can then add or remove emails as needed.
-
Date Subscribed sends a series of emails to subscribers based on the date that they signed up or were added to a list in your account.
-
Joins List Group is used to send to subscribers as they join one of the groups in your list. The Send Immediately option will send to everyone currently in the group.
-
Leaves List Group is used to send to subscribers when they leave one of the groups in your list. The Send Immediately option will send to everyone on your list who is not in the group.
-
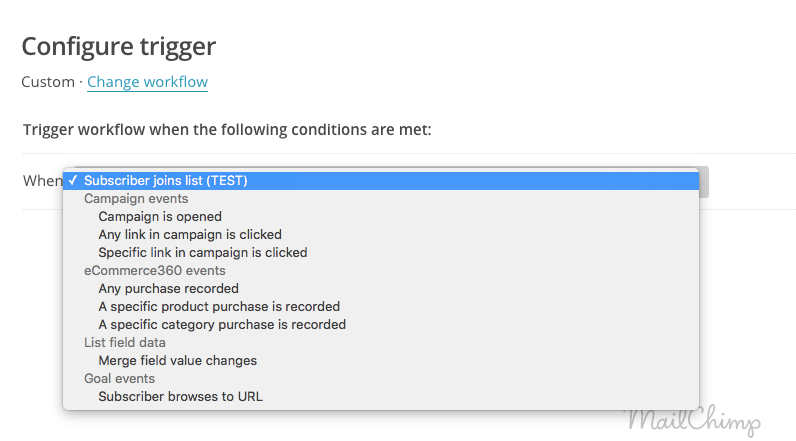
Custom Workflow pre-built workflows have triggers defined for you—you’ll just need to input values for the trigger criteria. Custom workflows require you to define the trigger. Triggers you can choose from with custom workflow:
1. Navigate to the Automation page and click the Create Automation Workflow button.
2. To choose the list that will receive the emails in your workflow, make the appropriate selection from the Choose a list to get started drop-down menu. You'll have the option to segment recipients later.
3. Find the workflow type you'd like to use, and click Select. Available workflows display based on the list you've selected. To use one of the grayed-out workflows, your list needs to meet the indicated requirements.
4. In the Setup step, fill out the Workflow configuration fields and choose your tracking options. These settings will be applied to all the emails in your workflow. You'll configure each email's settings later.
5. Click the Send activity digest email check box to receive a daily email with reporting data for your workflow. Select Edit to choose which account users you want the digest email to send to.
6. In the Trigger step, confirm or customize your trigger. Some triggers require more information from you, others are defaults based on the workflow type you chose on the List and Workflow step.
7. During the Emails step, add and design emails , organize them in your workflow, set up your segmentation conditions, and tell us when each email should send.
8. In the Confirm step, look over the Pre-delivery Checklist and test your emails if you haven't already. Click Resolve or Edit to make changes.
9. When you're finished reviewing, click Start Workflow.
Add and edit emails
Automation workflows can have one email or up to 100 emails. You'll add, design, and organize your emails in the Emails step.
Create an email
1. Navigate to the Emails step and click Add Email.
2. Some workflow types, like Annually Recurring Event, will recommended starting with a specific number of emails and offer the option to add all of those emails to your workflow at once. Keep in mind, however, that you can add or remove emails from your workflow at any time.
3. Click Design Email.
4. Fill out the Email Information. These fields only refer to the specific email you are editing, not the entire workflow.
5. You can use automation merge tags in your subject line to automatically display the numbered position of the email within the workflow. If you reorder your emails, the merge tag will update with the new position. The merge tags can also be used in your email content in the Design step.
6. During the Template step, choose your layout from Basic templates, Themes, Saved Templates, or Code Your Own. Click Select next to the template you want to use.
7. Next, you'll design your campaign in the Email Designer and click Finish.
8. On the final step, Scheduling/Segmentation, you’ll determine the days and times at which the email will send. On this step, you'll choose your segmentation conditions and determine a post-sending list action.
Set workflow timeline
The first email in your workflow will send when a subscriber meets the trigger criteria. Generally, delay times for subsequent emails are relative, meaning they're based on the previous email in the workflow. If you're using an absolute date-based workflow, your delay times will appear on the timeline before and after the trigger date.
1. Navigate to the Emails step.
2. Click Change delay.
3. Choose when you want the email to go out. Input a number in the first field, and choose hour(s), day(s), month(s), or immediately.
4. If you want to apply the same delay to all the emails in your workflow, check the box next to Apply to all. The immediately option is only available on the first email in a workflow.
5. Save your changes.
You can Send a Test Email or Save and Exit from the navigation bar at any time.